
How to use
this page:
If you have Command Strips or No More Nails strips, read how to use them first just below here - don’t skip this!
For item-specific instructions, make your selection below that.
You’ll find instructions on how to remove Command Strips and No More Nails strips further down.
How to install Command Strips and No More Nails strips

Remove the backing paper and press firmly onto the back of the item (shelf, frame etc.) for 10 seconds.
Remove the other backing paper and press firmly onto the wall for 10 seconds.
Wait a couple of hours before putting any weight on it.
Where and when to use (and not use) adhesive strips
Adhesive strips should only be used on clean, sound surfaces. Dust, grease, flaky paint and other contaminants will stop the adhesive from sticking properly.
Adhesive strips should only be used on smooth, painted surfaces. Textured walls, wallpaper and bare brick are a bad idea.
Check that the paint on your walls isn’t dusty or loose.
Don’t touch the surface that you’re going to stick a strip to. Even if your hands are clean, moisture and oils from skin are the number one cause of problems with adhesive strips.
Don’t be tempted to touch the adhesive. It doesn’t feel as sticky as you probably think it will, and touching it will make it less effective. (The adhesive is pressure-sensitive, which means pressing on it activates it.)
If your wall suffers from very severe temperature variations, you might be better choosing another location.
Be mindful of weight limits. A Command Strip will hold up to about 500g comfortably, but when you put something onto a shelf you introduce extra weight.

Item-specific Instructions
-
Kallax Backstops
The backstop should slot over a shelf and provide a stop for that shelf and the one below, with the larger part extending down. So for a 2×4 stood upright, for example, you’ll have backstops on the top and bottom internal shelves. If you have an odd number of rows (3x3 or 5x5, for example) you'll have a set of smaller single shelf pieces for your top row and then the standard double pieces for the row below that, then miss a row, and so on.
You should try a piece first to check for fit. If it's loose, stick rubber bumpers into the circle indents on one side of the smaller opening and that should then result in the right fit - although, this depends a bit on where in the world you are. If you’re likely to need a second set of bumpers, I’ll usually have included them. If not, get in touch.One you’ve installed your rubber bumpers (if using), push a pair of backstops onto the back of the shelf, pressing them firmly into place.
…And that’s it! Now turn your Kallax round and get your records lined up nice and neat. (Don’t be violent with them - it’s assumed you’ll treat your records with the respect they deserve!)
-

Sticky Tab Shelves (Single Command Strip)
Make sure the back of the shelf is clean. Make sure the wall is clean and the paint isn’t flaking.
I’d advise using a spirit level.
Place a Command Strip length-wise on the back of the shelf with the removal tab sticking out the side, following the instructions above for installing Command Strips.
New sleeves - doubles in particular - may open themselves up and push away from the wall. After a few weeks of sitting in a shelf with others, that’ll settle down and they’ll be ok on the shelf, but if needs be you can always use a second shelf inverted at the top, or try the brackets I sell instead. (If you want to swap, give me a shout.)
Be mindful of the weight limit as outlined above.
-

Heavy Duty Sticky Tab Shelves (Two Command Strips)
Make sure the back of the shelf is clean. Make sure the wall is clean and the paint isn’t flaking.
I’d advise using a spirit level.
Place two Command Strips on the back of the shelf with the removal strips sticking out the side, following the instructions above for installing Command Strips.
New sleeves - doubles in particular - may open themselves up and push away from the wall. After a few weeks of sitting in a shelf with others, that’ll settle down and they’ll be ok on the shelf, but if needs be you can always use a second shelf inverted at the top, or try the brackets I sell instead. (If you want to swap, give me a shout.)
Be mindful of the weight limit as outlined above.
-

Screw Shelves
Once you’ve decided on your layout, drill a 6mm hole and then insert the Rawlplug. (If drilling into a surface that doesn’t require plugs, drill a 3mm pilot hole, but seek help from a professional if you’re not sure.)
Screw in the screw until the head is 5mm from the wall surface. There’s a keyhole in the back of the shelf - place this over the screw. Slide/push it down until it stops. (Only put pressure on the back of the shelf, not the bottom piece.)
It should be snug. If it isn’t, remove the shelf and tighten the screw a quarter turn. Repeat until it’s snug and the shelf is tight enough between the screw and wall.
If the shelf rotates, the screw isn’t tight enough.
You’ll find that new records - doubles in particular - will open themselves up and push themselves away from the wall. After a few weeks of sitting in a shelf with others, that’ll settle down and they’ll be ok on the shelf, but if needs be you can always use a second shelf inverted at the top, or try the brackets I sell instead. (If you want to swap, give me a shout.)
-

Vinyl Record Brackets
There are pictures on the Etsy listing that will definitely help if any of the following doesn’t make sense.
Make sure the back of the bracket and the wall are clean and free of contaminants.
Spacing...
For horizontal spacing you probably want at least a 7.5cm (3") gap between your records so there’s room to slide them in and out. To achieve that, you need a 40cm (15.5") gap from the side of one bracket to the next. (If you want a wider spacing, increase this.)
Instructions...
* Following the instructions given above for Command Strips, place two on the back of each bracket, with the removal tabs visible through the hole in the middle. (See pictures on the listing for example.)
* Using a spirit level, stick your bottom bracket to the wall first.
* Place an empty record sleeve on that bracket and fit a second bracket at the top so that the sleeve is held between the two, then stick it to the wall like the first one. Be careful to line it up vertically with the lower bracket. Remove the sleeve.
* Clip a little spacer block into the space on the back of each shelf (use the same size in both brackets). Use a fat one for a single LP, or a thinner one for thicker sleeves. Wait a couple of hours before sliding your record sleeve in from the side.
These brackets will allow you to hold single, double or triple LPs, gatefold or otherwise.
-

Vinyl Hooks (Three Little Ones)
Make sure the hook and wall are clean.
I’d advise using a spirit level and making marks or drawing lines to help you place your brackets.
1. I find it's easiest to choose a sleeve that has a geometric pattern so you can use that to line them all up. Pink Floyd's The Wall is perfect!
2. Following the instructions given above for Command Strips, place one strip on the back of each hook with the removal tab sticking out at the flat (not hooked) end.
3. I'd suggest you start with one of the bottom corners (see the listing for photos for how to lay them out relative to the sleeve). Line up where you want the hook to be and stick it to the wall. Repeat this for the other bottom corner.
4. Then use the record sleeve to line up where the top one should go. I'd advise lifting it a mm or so off the top of the sleeve to make sure there's enough room to slide a sleeve in and out. Some sleeves are slightly bigger than others so it’s a good idea just to double check you’re not using a particularly small one before you do this.
5. After a couple of hours, slide your sleeve in from the side.
-

Now Playing Shelves (Album of The Week etc. too)
Use a spirit level!
If drilling, use the included drill guide and drill according to the instructions written on it. (You can place the template on the wall and then use a pencil to push through and make a mark at each cross.)
Make sure your screw heads are 5mm from the surface of the wall and slide the shelf over the screws. It should be quite snug, but if not then you can tighten the screws a quarter turn at a time until it is.
If using sticky tabs, follow the instructions above for No More Nails strips and use all three strips (or four for longer shelves) on the back of the shelf, side by side.
(If you have trouble getting anything to stand up you probably have newer records, in which case you can place a sticky tab shelf upside down above the Now Playing shelf - use a record sleeve to measure where to put it - which will act like a bracket to hold the sleeve in place.)
-

Divider Letters
There are a few different types of divider letters so please check which ones you’ve ordered, since each type has its own suitability.
The small letters with a single thin tab should be attached to some cardstock or something similar.
The small letters with a taller tab will work fine with CDs and paperback books. With records or varying-sized hardback books your mileage will vary depending on how tight they are together and whether or not you keep them in plastic sleeves. If they’re tight and uniform, you should be fine without anything added, but if they’re looser, or stored in plastic sleeves, you may need to attach them to some cardstock or similar material.
The flat rectangular dividers will work fine if the media are uniform and fairly snug, but should be attached to cardstock or similar if not.
-

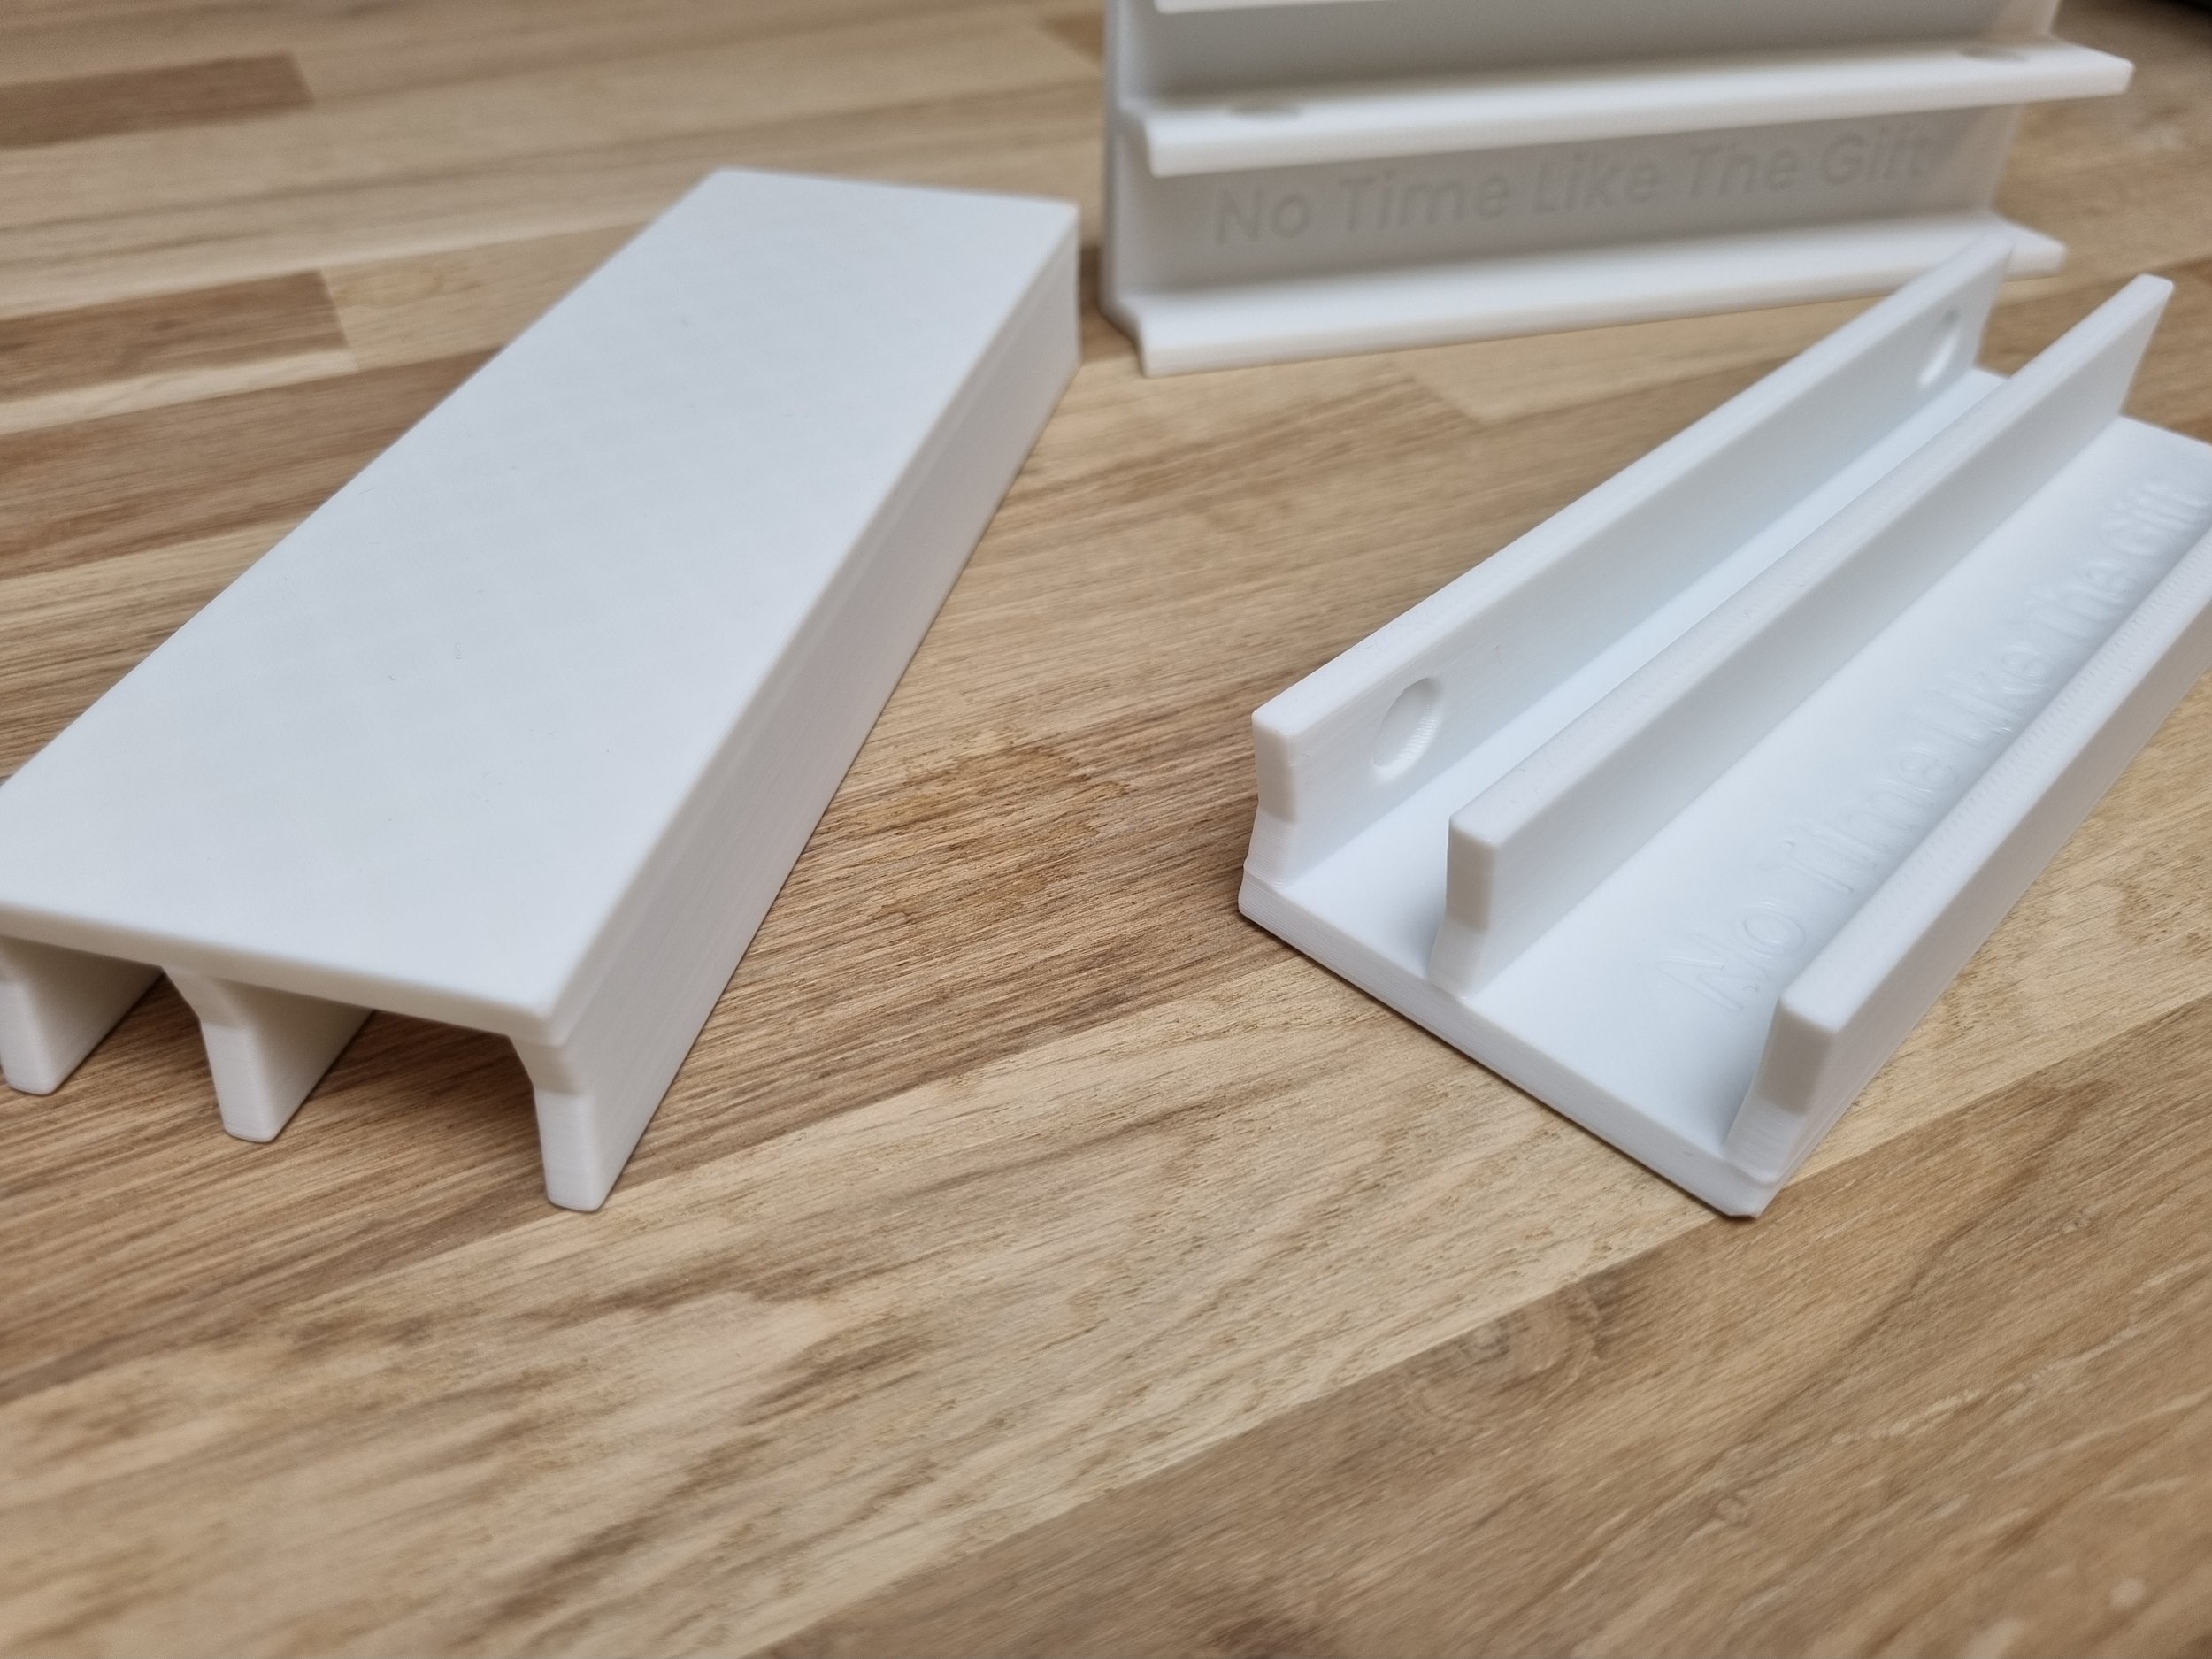
FunkoPop Shelves
Make sure the shelf piece and wall are clean and sound.
Make sure you have the backing piece the right way up: the larger of the little protruding ridges on the front should be at the bottom. Following the instructions given above for Command Strips, place a strip on the back of the backing piece and stick it to the wall.
Next, insert the shelf into the backing piece. There’s a pair of small notches on the shelf that should sit either side of the backing piece, so that the shelf is centred. It’ll be quite a tight fit but just push it in straight and firm until it’s fully seated.
Remember to wait a couple of hours before putting anything on the shelf.
-

Boxed FunkoPop Shelves
Make sure the back of the wall piece and the wall itself are clean and sound.
Make sure you have the backing piece the right way up: the larger of the little protruding ridges on the front should be at the bottom. Following the instructions given above for Command Strips, place one on the back of each backing piece. Don’t remove the final backing paper yet.
Next, insert the two shelf pieces into a pair of backing pieces. They’ll be quite a tight fit but just push them in straight and firm until they’re fully seated.
Take your spacer and push the shelf pieces onto it so that you have your shelf pair held together. (You can see this in the photo.)
Finally, remove the final backing paper from the Command Strips and press firmly against the wall for 10 seconds in your chosen spot. You can remove the spacer once the shelf is in place on the wall. Leave it a couple of hours before you put anything on it.
-

CGC Brackets
You’ll find two different sizes of Command Strip. The bigger one is for the smaller shelf. The bigger shelf takes two smaller Command Strips.
Check that the brackets and wall are clean.
Following the instructions given above, start by placing two small Command Strips on the back of the bigger bracket, so that the removal tabs are pointing upwards, and stick this to the wall.
Next, place the bigger Command Strip on the smaller bracket, with the remova tab sticking out sideways. Hold a CGC slab on the bottom bracket and then place your smaller bracket over the top so that the slab is held in place between the two, then slide the slab out the side and press firmly on the back surface of the top bracket to stick it to the wall. Leave it for a couple of hours, then slide your CGC slab back into place.
-

Comic Shelves
Make sure the back of the shelves and the wall are clean and free of dust.
Ideally the comic book should be in a plastic wallet/sleeve. If not you might find it slumps a bit, though you can mitigate that a bit by inserting a piece of cardstock.
Following the instructions given above for Command Strips, place one on the back of each bracket with the removal tab sticking out the side. Line up your bottom bracket and stick to the wall, then use a comic to line up the top bracket and stick that to the wall.
After a couple of hours, slide your comic in from the side.
-

Now Showing & Now Playing DVD/ Blu-ray Stands
For the wall-mounted frames, follow the instructions above to install four Command Strips on the back of the frame, with the removal tabs sticking out in the middle. You can also use screws through the holes in the back.
For all stands and frames, you’ll see a small nub on the right-hand-side of the inner edge of the frame. This is to hold the case in place. You should put the case in against this and then press the other side in.
-

GameTiles
Make sure the back of the GameTile and the wall are clean.
Make sure you have the GameTile the right way up: the hole in the back should be towards the bottom. Follow the instructions given above to install a Command Strip with the removal tab sticking into this hole, then stick it to the wall.
To insert a game, slide in from the bottom and then push in. The lip inside the top will hold the game in.
To remove a game, press the top of the game and the bottom will poke out slightly, then just hook a finger under the bottom and take the game out. (You might find you need to push the game cartridge upwards slightly when you press in the top. Although all games are supposed to be the same size, there are some very slight differences that might make some tighter than others.)
-

Trading Card Frames
Make sure the back of the frame and the wall are clean and free of dust and grease. Clean with an alcohol wipe or rubbing alcohol.
Make sure you have the frame the right way up: there’s a gap at the top to slide the card in. Place a Command Strip (red text side) on each of the rectangular sections on the back so that the removal tab is facing downwards. Press on them firmly against a flat surface for 10 seconds.
Next, remove the final backing paper from the Command Strip (black text side) and then press firmly against the wall for 10 seconds in your chosen spot.
How to remove Command Strips
Press against the body of whatever is stuck to the wall to hold the strip firmly, then gently pull the removal tab.
As the removal tab stretches, move your grip closer to the body.
If the removal tab snaps and you can’t grab what remains, twist the body rather than pulling it.
How to remove No More Nails strips
Pull a strong thread behind the body to break the contact with the wall.
If you can’t do this, twist the body rather than pulling.